
Integrating a Gas Insert Fireplace Controlled by a Proflame 2 Transmitter with Home Assiststant
Motivation
My initial motivation to automate the fireplace was to make sure it always turned off when I went to bed. I primarily use the “smart temperature” mode where the RF remote has a temperature sensor and will turn the fireplace on/off when it hits the programmed target temperature.
This is great, but if you don’t remember to turn the remote off, it will continue to turn the fireplace on/off all night. Because the flames might not be on when I am heading to bed, I tend to forget the remote is still on and controlling the fireplace.
So my main goal was to be able to write an automation to automatically turn the fireplace off at a certain hour, if it was on.
Integrating with Home Assistant
Hardware
The gas insert fireplace uses the Proflame 2 system and is controlled by their Proflame 2 Transmitter Remote. The remote operates over a Radio Frequency (RF). It can only be controlled via RF or a battery powered emergency module when the power is out. There is no physical switch to turn the fireplace on, and can only really be controlled via RF.
After doing some research, I came up short on a definitive answer on how to control it, but it seemed like it was supported by the Bond Bridge. I went ahead and ordered one and Home Assistant picked it up immediately after I programmed the remote command with the Bond Bridge. On the Home Assistant side, it was discovered in the integrations area without any need for manual yaml configuration.
The problem was that both Home Assistant and the Bond Home app wasn’t working, even though
the bridge was indicating it successfully registered the command. I reached out to support
and discovered it needed to be manually programmed. For reference the FCCID for this product
is: T99058402300. I could just barely make this out on the remote, it had been used for
a year and was nearly non-visible.
Programming Commands
With some manual steps you can turn the fireplace on/off and control the flames up/down.
One thing to note is that as of 10/31/21, the entity created by the bond integration
will be represented by the light domain. Toggling the light.fireplace will turn it
on/off and the brightness slider will increase or decrease the flames. Below are the
steps required to configure these commands in the Bond Home app.
Power On
- Set the fireplace state to ON using the remote control.
- In the BOND application select the + (plus) sign.
- Select Remote Control then choose your bond
- Select Fireplace and set the location and device name and click Continue.
- In Select the function you want to program, choose the OFF command to record.
- Select Advanced Settings
- Select Signal type and click Radio Frequency (RF)
- Tap on Frequency and Enter 315 into the frequency rectangle and select done. If there is existing data, please delete it first.
- Turn OFF “Search Remote Database” and click save.
- Select “Start” and continue with the pairing process by pressing and releasing the power button of the remote.
- The bond center ring should turn Green once the command has been programmed
- Test if the On command works in the Bond Home Application.
- Select yes it works
Power Off
- After configuring the above Power On command, when you are asked to select or choose another command to program, this time, choose the Power ON command.
- Make sure the actual state of the fireplace is turned off.
- Select “Start” and continue with the pairing process by pressing and releasing the power button of the remote.
- The bond center ring should turn Green once the command has been programmed
- Test if the Off command works in the Bond Home Application.
- Select yes it works
Flame Up
- When you are asked to select or choose another command to program, this time, choose the Flame UP command.
- Select “Start” and continue with the pairing process by pressing and releasing the UP button on the remote. And Make sure the mode of your remote is set to control the flame.
- Test if the command works in the app.
Flame Down
- After confirming Flame Up works, choose another command to record.
- This time choose the Flame Down command
- Select “Start” and continue with the pairing process by pressing and releasing the DOWN button on the remote. And Make sure the mode of your remote is set to control the flame.
- Test if the command works.
- Once you are done programming the commands, save the remote control.
Automations
As of writing, I have 3 primary automations for the fireplace. All of these were created in Node-Red, but could also easily be done as a normal Home Assistant automation. Since I already have 99% of my automations in Node-Red I added these there too.
Smart temperature mode
This automation replicates the functionality of the Proflame II Transmitter remote. A target temperature is set and the fireplace will turn on until it reaches that temperature. When the temperature in the room drops below the target it will turn on, otherwise it will turn off. I already had a temperature sensor in the room with the fireplace, so I used that entity to probe the temperature of the room.
I first created two helpers in Home Assistant.
- A toggle helper to enable / disable the fireplace smart temperature mode.
- A number helper to configure the target fireplace temperature for the smart mode.
From here the automation is pretty simple. The device I am using for getting the temperature of the room reports updates approximately every 5 minutes. It takes the current state and compares it against the configured number helper state and if it’s less it will send it to the first output to turn on the fireplace. If it’s greater than the configured value, it will send it to the second output to turn off the fireplace.

One interesting thing in this flow is the first node. A JSONata expression is used to extract the state of the number helper so we can compare the current temperature to the specified target temperature.
Auto off
This one is very staright forward, I just want to ensure that the fireplace gets turned off at a specific time every night. This just uses an inject node to specify a time and then runs the service call to switch off the fireplace.

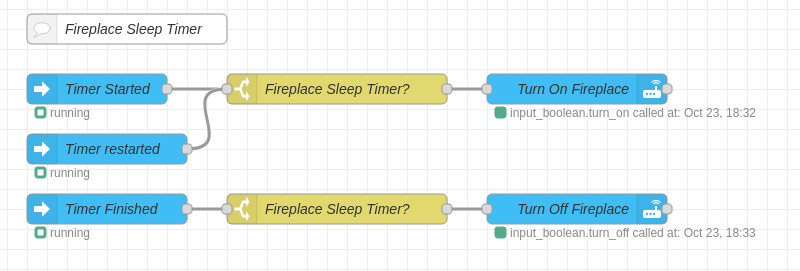
Sleep timer
The Proflame 2 transmitter remote does not expose a sleep timer function, so I built one into Home Assistant. This automation uses 2 Home Assistant helpers.
- A number helper that allows the number of hours (in half hour increments) to be specified to set the sleep timer.
- A timer helper that will handle starting/restarting/finishing based on the number configured above.
The automation is in Node-Red, but it’s triggered via the lovelace dashboard. I’ll go into the lovelace dashboard configuration in the Home Assistant Dashboard section below. The automation looks for timer started/restarted events to turn the fireplace on. The timer finished event triggers turning the fireplace off.
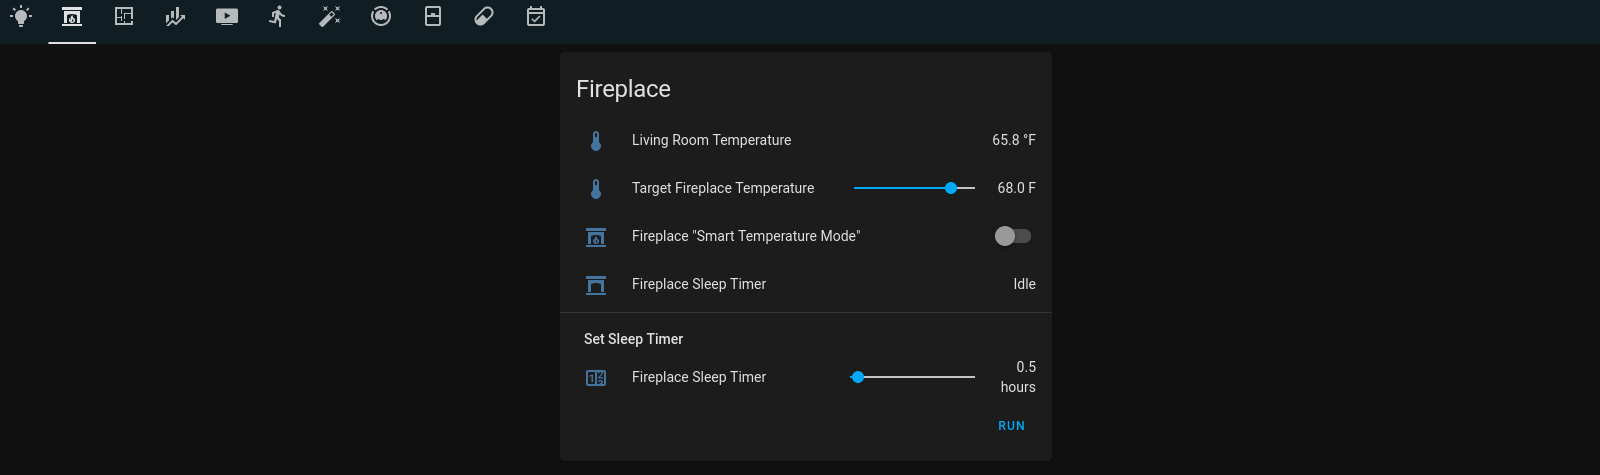
Home Assistant Dashboard
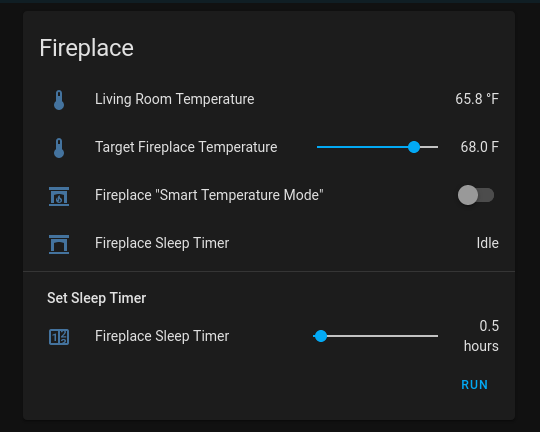
The fireplace dashboard in lovelace consists of a single card. The top section displays:
- The current temperature of the room the fireplace resides.
- A number input to configure the target temperature for the “Smart Temperature Mode”.
- A toggle to turn on/off the fireplace “Smart Temperature Mode”.
- The timer entity which displays the remaining time left on the timer (if activated).
The bottom section allows for one to set the number of hours (in half hour increments)
until the fireplace should turn off. Specifying a value and clicking the RUN button
will start the Home Assistant timer which Node-Red observes.
Below is the yaml for the fireplace dashboard.
---
title: Fireplace
path: fireplace
icon: "mdi:fireplace"
cards:
  - type: "custom:card-templater"
    entities:
      - input_number.fireplace_sleep_timer
    card:
      type: entities
      title: Fireplace
      entities:
        - sensor.living_room_temperature
        - input_number.target_fireplace_temperature
        - entity: input_boolean.enable_fireplace
          name: 'Fireplace "Smart Temperature Mode"'
        - timer.fireplace_sleep_timer
        - type: section
          label: Set Sleep Timer
        - input_number.fireplace_sleep_timer
        - type: call-service
          service: timer.start
          service_data:
            entity_id: timer.fireplace_sleep_timer
            duration_template: "0:00:00"
          name: " "
          icon: " "
The above yaml requires one custom card, the lovelace-card-templater.