
Building a Home Assistant Custom Component Part 3: Config Flow
This is the third part of a multi-part tutorial to create a Home Assistant custom component.
- Part 1 - Project Structure and Basics
- Part 2 - Unit Testing and Continuous Integration
- Part 3 - Config Flow (Reading Now!)
- Part 4 - Options Flow
- Part 5 - Debugging
Introduction
In this post we will be updating the custom component to be able to be configurable via the UI, by adding a config flow. We are still using the same example project, github-custom-component. You can find the diff for this post on the feature/part3 branch.
Updating manifest.json
The first step is updating our manifest.json.
We set the config_flow key to true, this will let Home Assistant know that this
component can be added via the configuration UI.
 {
   "codeowners": ["@boralyl"],
-  "config_flow": false,
+  "config_flow": true,
   "dependencies": [],
   "documentation": "https://github.com/boralyl/github-custom-component-tutorial",
   "domain": "github_custom",
Adding the Config Flow
Next up we will create our config_flow.py file.
Within this file we will extend the ConfigFlow class and define the different steps
that should show up in the UI when a user is setting up the component for the first time.
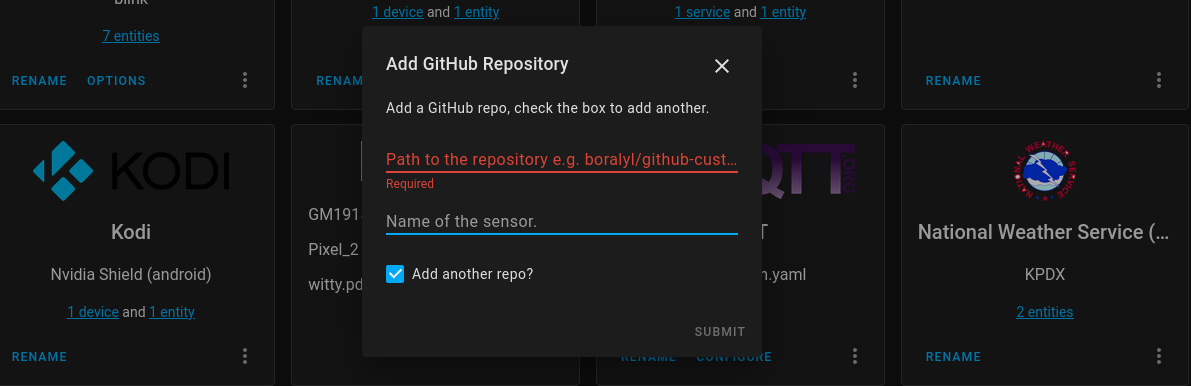
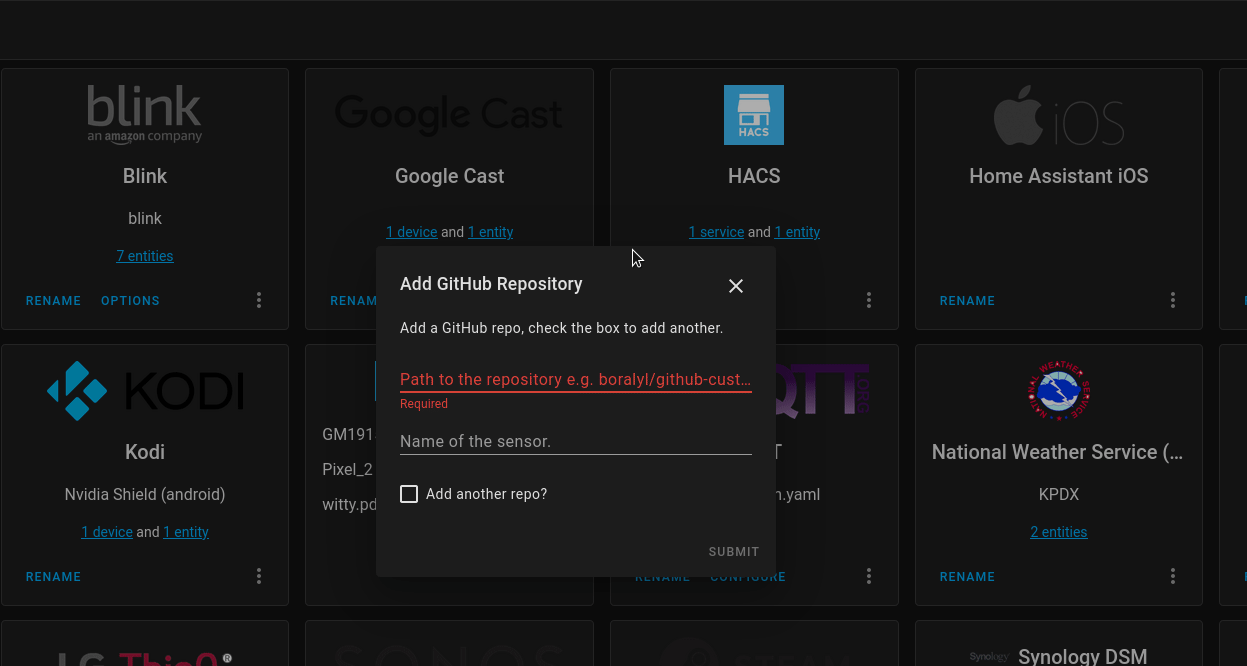
As of writing, having a component that requires an unknown sized list of configuration values isn’t the easiest thing to do via config flow. To try to get around this limitation, I decided to design the config flow to have 2 steps. The first step asks for the user’s GitHub access token and optional enterprise server URL. After submitting that information the user precedes to the second step which allows them to enter a repository and optional name for it. To allow the user to add an additional repository I added a checkbox that if checked will repeat the second step. The user can do this as many times as they want until they have added all of the repositories that they want sensors created for.
User Step
The async_step_user method of our config flow class is invoked when a user clicks the add button and chooses the GitHub Custom integration.
Let’s walk through what this method does.
async def async_step_user(self, user_input: Optional[Dict[str, Any]] = None):
    """Invoked when a user initiates a flow via the user interface."""
    errors: Dict[str, str] = {}
    if user_input is not None:
        try:
            await validate_auth(user_input[CONF_ACCESS_TOKEN], self.hass)
        except ValueError:
            errors["base"] = "auth"
        if not errors:
            # Input is valid, set data.
            self.data = user_input
            self.data[CONF_REPOS] = []
            # Return the form of the next step.
            return await self.async_step_repo()

    return self.async_show_form(
        step_id="user", data_schema=AUTH_SCHEMA, errors=errors
    )
The user_input variable defaults to None when this step is first called. When the
user clicks the submit button the variable will be populated with a dict containing the
data they entered. Home Assistant will do some basic validation on your behalf based on
the data schema that you defined. I added some additional validation that will use the
provided access token to ensure it’s validity. If it fails we set the base error to
auth. This value corresponds with the errors object in the strings.json and will display the description defined there.
If there are no errors, the data is stored in the self.data attribute of the class. In
addition to storing the entered data I also initialize an empty list for the repositories
that will be added in the next step. Finally, we call the next step’s method asyn_step_repo
to advance the user to the second form where they can enter all of the GitHub repositories
that they want to monitor.
Repo Step
The async_step_repo method is invoked after the
user successfully completes the initial step. This step is responsible for showing a form
to enter repository information. If the user ticks the Add another repo checkbox then
we save the entered data and reset the form on submit.
The logic in this method is very similar to the first step.
async def async_step_repo(self, user_input: Optional[Dict[str, Any]] = None):
    """Second step in config flow to add a repo to watch."""
    errors: Dict[str, str] = {}
    if user_input is not None:
        # Validate the path.
        try:
            validate_path(user_input[CONF_PATH])
        except ValueError:
            errors["base"] = "invalid_path"

        if not errors:
            # Input is valid, set data.
            self.data[CONF_REPOS].append(
                {
                    "path": user_input[CONF_PATH],
                    "name": user_input.get(CONF_NAME, user_input[CONF_PATH]),
                }
            )
            # If user ticked the box show this form again so they can add an
            # additional repo.
            if user_input.get("add_another", False):
                return await self.async_step_repo()

            # User is done adding repos, create the config entry.
            return self.async_create_entry(title="GitHub Custom", data=self.data)

    return self.async_show_form(
        step_id="repo", data_schema=REPO_SCHEMA, errors=errors
    )
One key difference is that we continue to return the current step if the add_another
checkbox is checked. When the user is done the final step is to call the
async_create_entry method which will create our config entry and register it with
Home Assistant.
Setting Up the Config Entry
The next thing that we need to do is set up our sensors from the config entry that was
created. In the __init__.py file we define an async_setup_entry function that will
forward the task to the sensor platform. For more details on how this works I encourage
you to checkout out the excellent documentation on the subject.
async def async_setup_entry(
    hass: core.HomeAssistant, entry: config_entries.ConfigEntry
) -> bool:
    """Set up platform from a ConfigEntry."""
    hass.data.setdefault(DOMAIN, {})
    hass.data[DOMAIN][entry.entry_id] = entry.data

    # Forward the setup to the sensor platform.
    hass.async_create_task(
        hass.config_entries.async_forward_entry_setup(entry, "sensor")
    )
    return True
In the function above we are storing the data for the config entry in hass under our
DOMAIN key. This will allow us to store multiple config entries in the event the user
wants to setup the integration multiple times. Perhaps they have an enterprise server
account for work and a regular personal account. They can set up 2 different entries,
corresponding to each of those cases.
We then forward the setup to the sensor platform. In sensor.py
we add an async_setup_entry function which will accept a config entry instance and create
the sensors for the component. You will notice this function looks nearly identical to the
async_setup_platform function below it which is used for setting up the sensors from
configuration.yaml. The only difference is we retrieve the config data from the config
entry instance.
async def async_setup_entry(
    hass: core.HomeAssistant,
    config_entry: config_entries.ConfigEntry,
    async_add_entities,
):
    """Setup sensors from a config entry created in the integrations UI."""
    config = hass.data[DOMAIN][config_entry.entry_id]
    session = async_get_clientsession(hass)
    github = GitHubAPI(session, "requester", oauth_token=config[CONF_ACCESS_TOKEN])
    sensors = [GitHubRepoSensor(github, repo) for repo in config[CONF_REPOS]]
    async_add_entities(sensors, update_before_add=True)
Translations
I briefly touched on strings.json when explaining how errors are defined. This file
contains strings used in the config flow process. I copied strings.json into the translations
folder and renamed it en.json for the English translation. You can add as many translation files as you would like, they
should be named using the 2 letter ISO 639-2 language code. All the keys should be the same as
the strings.json and the values should be the translated string. For example, this is
the Norwegian translation file for another one of my custom components: nb.json.
For more information on translations in custom components check out the official documentation.
Unit Tests
I wanted to briefly touch on how to unit test the config flow. If you install and use pytest-home-assistant-custom-component you can make use of some pytest fixtures that make testing much simpler.
Let’s take a look at a test to verify that we display an error if the GitHub access token is invalid.
@patch("custom_components.github_custom.config_flow.validate_auth")
async def test_flow_user_init_invalid_auth_token(m_validate_auth, hass):
    """Test errors populated when auth token is invalid."""
    m_validate_auth.side_effect = ValueError
    _result = await hass.config_entries.flow.async_init(
        config_flow.DOMAIN, context={"source": "user"}
    )
    result = await hass.config_entries.flow.async_configure(
        _result["flow_id"], user_input={CONF_ACCESS_TOKEN: "bad"}
    )
    assert {"base": "auth"} == result["errors"]
In this test we mock the validate_auth function and cause it to raise a ValueError.
The hass parameter passed to our test comes from a pytest fixture installed by
pytest-home-assistant-custom-component. First we initialize the flow by specifying
our domain and which step, in this case user. We then run that step in the flow and
pass in our user input. The result contains an errors key that we assert matches our
expectation.
Next Steps
With this code in place we can now configure and add repos via the UI instead of the
configuration.yaml file. When you are developing a new config flow, make sure to
do a hard referesh in your browser when you’ve modified files and restarted Home Assistant.
I’ve noticed the browser can cache some of this information causing you to see outdated
data.
The one glaring issue with our implementation is that there is no way to remove or add new repositories without creating a new config entry by initializing the flow again. While this works, it’s not ideal as you need to re-enter your GitHub access token each time. In the next post we’ll look into how we might be able to use the OptionsFlowHandler to get around this limitation.