
Tips for creating a Floorplan in Sweet Home 3D (For use in Home Assistant)
In a previous post I showed off my 3D floorplan in home assistant. In this post I’m going to give some tips for creating your own 3D floorplan for use in home assistant. I’m going to focus more on things that I wish I knew when I first got started.
Before you start using SweetHome3D, I highly recommend that you check out this video from DrZzS that goes over the basics of creating your floorplan. I found it extremely useful and it covers a lot of topics that took me quite a bit of time to figure out on my own. The User Guide on the Sweet Home 3D website is also very good resource to get started.
Importing Additional Furniture
You can import your own models when you can’t find furniture that quite matches
what you are looking for. Sweet Home 3D
provides a decent list of websites that provide free models. However you can
go beyond that list of websites and import nearly any model you find online that
is in OBJ, DAE, KMZ or 3DS formats.
You can easily import these models by navigating to the Furniture menu item
and clicking on Import furniture.... Follow the wizard and make sure to tick
the Add to Catalog checkbox and choose an appropriate category so that you can
easily find it when you want to add it to your floorplan. I’d also double check the
default name and rename it as appropriate since sometimes it’s not exactly human
readable.
Use Your Own Textures
Similar to importing furniture, you can also import additional textures. However the bar to entry for creating your own textures is much lower than creating a new model.
For best results you will want to make sure your texture is seamless so that it can be repeated without looking like there are abrupt edges. You can take a picture of something you would like to use as your texture then open it up in an image editor like Photoshop or Gimp to crop it. When taking the photo ensure that the lighting is even otherwise if one edge of the image is brighter it will not look good when it repeats the texture. It’s recommended to make it square and for it’s size to not exceed 256x256 pixels.
After exporting your texture you can then import it by selecting the
Furniture menu item and clicking on Import texture.... Then follow the wizard
and ensure you update the Name and Category so you can find it later.
Most models also have multiple parts that construct them and each individual
part can have it’s material changed. Right click on any furniture in your floorplan
and select Modify furniture.... Under the Color and texture fieldset select
the Materials radio button and click the Modify... button. If the furniture
has multiple textures they will be listed in the pop up window.
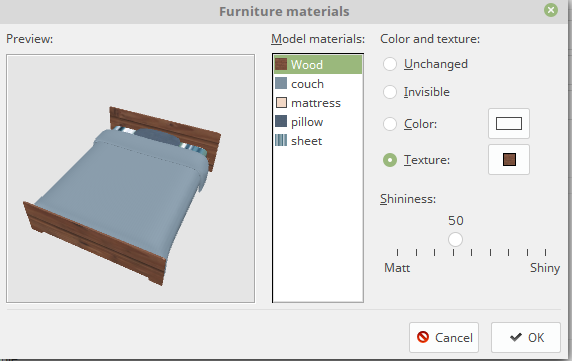
When a material in the model is selected like Wood in the example above it will
flash in the Preview so you know which material it’s referring to. With the material
you want to modify selected you can make it invisible (for example maybe you want
to remove the comforter from the model), change it’s color, or select a new texture
to apply to it. Repeat this process for each material you want to change.
Change the Sky and Ground
This one was not obvious. In order to add a sky color or image first make
sure you have one of the 3D view panels open (e.g. Aerial or Virtual Visit). Then
simply right click in the 3D view panel and select Modify 3D view.... From here
you can not only change the color/image for the sky but also for the ground. Also
very useful is the light brightness setting. This value was way too high by default
for me and made things too shiny when you rendered with the Add ceiling lights
checkbox on.
Rendering
Rendering your model applies lighting effects and generates a more high quality
image of your floorplan and the models within it. Before you start a render, enter
the Aerial View from the 3D View menu item. Then rotate and adjust the angle
of the camera so that you can get the entire floorplan visible in an acceptable
way to you. Once you have found your ideal camera placement, right click on the
3D view panel and select Store point of view... then give it a useful name.
This will allow you to continue to modify your floorplan and move the camera around
while still being able to return to your zoomed out floorplan view. To get back
to a saved point of view, right click in the the 3D view panel and select
Go to point of view > and select the point of view that you had saved.
Now that you have your ideal point of view you will need to decide how you want
to do the lighting. You have a few options. First you can not add any lighting
fixtures to your floorplan and simply tick the Add ceiling lights checkbox
in the Create Photo dialog. This will automatically add a light source to every
room you created in your floorplan. Note that lights will only abe added to areas
that you specifically created rooms using the Create rooms tool. Simply having
4 walls is not enough information to tell Sweet Home 3D that the area you created
is a room.
The 2nd option is to add lighting fixtures to each room and adjust the light power
for each fixture manually. To do this right click on a lighting fixture and select
Modify furniture.... At the bottom right of the pop-up you will see a field to
adjust the Light power (%). This will take a bit of experimentation to determine
what value you like for your model. I would render the image then adjust the
percentage based on if I thought it was too dark or too bright. For my particular
case I found 50% to be the ideal value. You can also update the light power for
all lights at once by holding the Shift key and left clicking on each lighting
fixture in your floorplan. Then right clicking and selecting Modify furniture...
and changing the value for light power.
Now it’s time to select the render options for creating your photo.
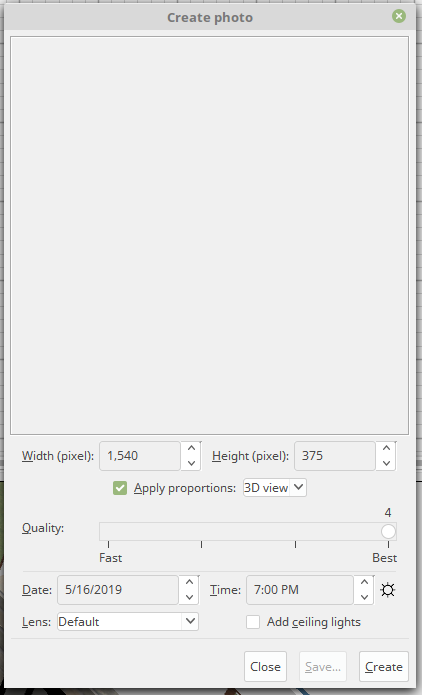
I’d recommend sticking with one of the options in the dropdown for the
Apply proportions. Note that if you select 3D view it will only render what
is currently visible in your 3D viewport. This confused me at first and resulted
in wasted time rendering photos.
Selecting Best for Quality is what you should do for your final photo. This will
take several minutes (or more) based on the specs of the computer you are using.
The Time field will change the outside lighting source. Your resulting photo
will obviously have different lighting if it’s rendered at noon compared to 7PM
in the evening. This is more of a personal choice as to what looks best to you.
Check out the following links for more detailed tutorials on lighting and rendering a great photo:
- http://www.sweethome3d.com/blog/2016/12/24/how_to_get_a_nice_photo_rendering.html
- http://www.sweethome3d.com/support/forum/viewthread_thread,6995
Get Creative
There are a lot of options for furniture with the default installation. However, sometimes you just can’t find the right model and you don’t want to learn Maya 3D or Blender to create your own. If you are creative you can combine existing furniture to create something new. See the example below:
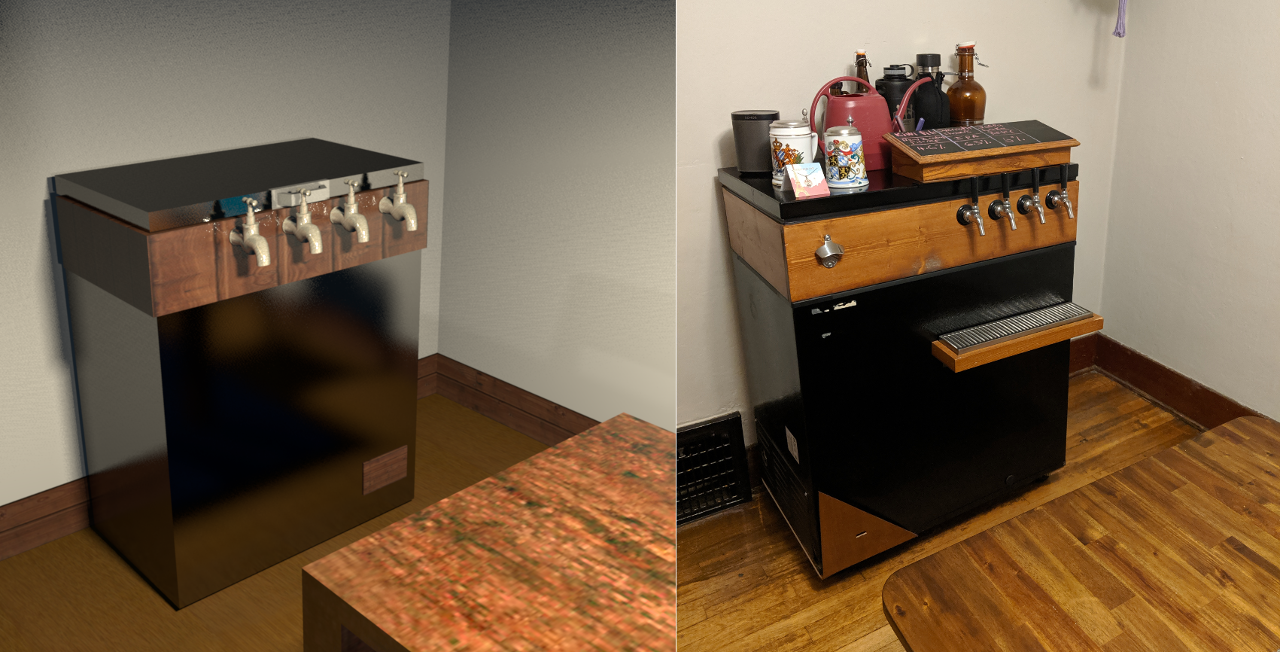
There was no model for a kegerator, but there was a chest freezer. After modifying the dimensions and textures I got a black chest freezer. I then added a cube shelf and rotated it so the back of the shelf was facing outwards. I adjusted the size to be slightly larger then the chest freezer and modified the texture. I then put the shelf inside of the chest freezer model so that it looks like a wooden collar. Finally, I added four garden faucets and placed them in the wooden collar I just added. As you can see from the render it looks pretty close to the real thing (especially when the floorplan is zoomed out).
Next Steps
Now that you’ve created the perfect floorplan it’s time to add it in home assistant. In my next post I”ll document exactly how you can have a realtime 3D floorplan that reacts to your various lights and sensors.