
Creating Android TV notifications from UniFi Protect Alarm Manager Alerts in Home Assistant
Problem and Desired Outcome
There’s nothing more annoying than being deep into a movie on your Nvidia Shield and hearing a ‘thud’ on the porch, only to have to fumble for your phone to see who is there. With the new UniFi Alarm Manager and Home Assistant, we can put that right on the big screen.
UniFi Protect began offering customized alerts and automations via its Alarm Manager in 2025. It provides a lot of useful functionality, especially if any of your cameras support smart detections. These are things like identifying objects (person, face, animal, car, etc) as well as other functionality like line crossing.
My goal was the following:
- A smart detection event occurs on a camera.
- This event is received in Home Assistant.
- A thumbnail from the camera is obtained.
- A push is sent to my Nvidia Shield devices that includes the image via the Notifications for Android TV / Fire TV integration.
[ UniFi Protect ] ----(Webhook POST)----> [ Home Assistant ]
                                               |
                                       1. Create Timestamp
                                       2. Save Snapshot to /www/
                                       3. Call Notify Service
                                               |
                                               v
[ Android TV ] <----(Display Image)------- [ Media Player ]
Why this Method?
As of writing, the official Protect integration does not support the full suite of smart detection events provided in UniFi Protect. You can trigger an automation when a camera detects motion or a person, but not a specific event like a person crossing a line you have configured for a camera.
The Protect Alarm Manager does support sending a push with a thumbnail and link to the clip which is very useful. However, I also wanted a thumbnail sent to my Android TV devices (Nvidia Shield), so I could see who was at the door if I was watching TV.
How to configure the alert in UniFi Protect Alarm Manager
Before creating this alert, you first need to create a webhook url. You can do this by creating a new automation and selecting the “When a Webhook payload has been received” trigger. (Or if using NodeRed, the Webhook node). From here you can copy the webhook URL for use when creating the alert in the UniFi Protect Alarm Manager. We’ll come back to this automation after we’ve configured the alarm in UniFi Protect.

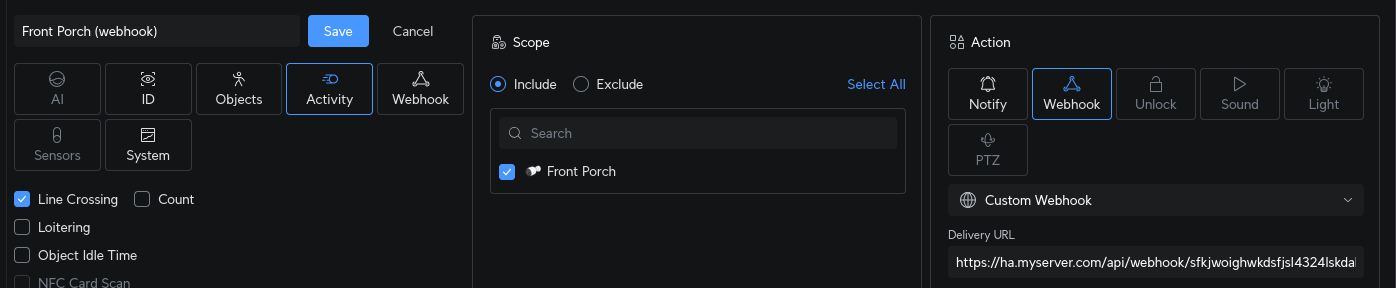
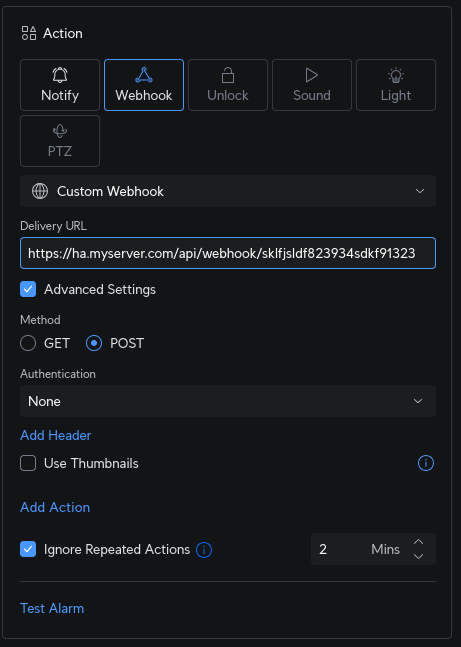
Now open the UniFi Protect Alarm Manager and click the Create Alarm button. Configure your trigger, in my case I wanted a line crossing and person detection. Then specify the scope, for this I chose my Front Porch camera. Finally configure the action. The important bits of information to configure are:
- Select
Webhookas the action. - Choose
Custom Webhookfrom the dropdown. - Paste in your Home Assistant Webhook URL we created previously.
- Enable the
Advanced Settingscheckbox and change theMethodtoPOST. - Optionally configure the
Ignore Repeated Actionsto rate limit how often this event will trigger.
Creating the Automation in Home Assistant
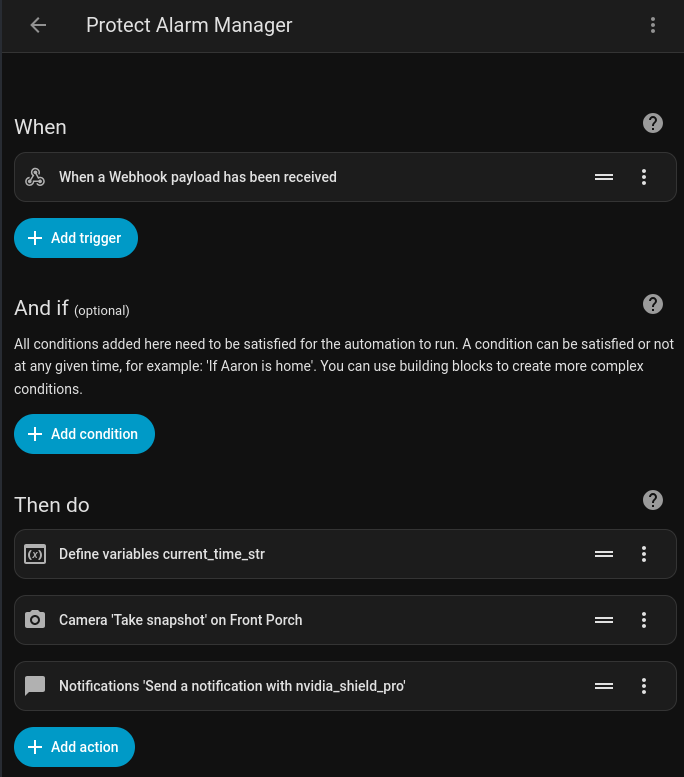
At this point you should already have an automation started as we needed one to generate a webhook url. It is the trigger of your automation. When it is triggered we perform 3 actions:
- We set a variable named
current_time_strwhich is the current date/time as a string, e.g.2026-01-07 17:03:37. We need this as a reference so that we can use it as part of the name of the snapshot image and then reference that image in the notification. - We take a snapshot from the camera entity and save it to disk using the
current_time_strvariable in the filename. I’m saving it directly to thewwwdirectory in Home Assistant to make it easy to access without requiring authentication. The filename will end up looking likefront_porch_2026-01-07 17:03:37.jpg. - We then setup our notification and include the filename as an image.
Here is the raw yaml of the automation:
alias: Protect Alarm Manager
description: "Sends notification to Nvidia Shield when a person comes on the front porch."
triggers:
  - trigger: webhook
    allowed_methods:
      - POST
      - PUT
    local_only: true
    webhook_id: "iJKLSFJKSHKOHQBFH" # Replace with your actual ID
conditions: []
actions:
  - variables:
      current_time_str: "{{ now().strftime('%Y-%m-%d %H:%M:%S') }}"
  - action: camera.snapshot
    metadata: {}
    target:
      entity_id: camera.g6_bullet
    data:
      filename: /config/www/camera_snapshots/front_porch_{{ current_time_str }}.jpg
  - action: notify.nvidia_shield_pro
    metadata: {}
    data:
      data:
        duration: 10
        position: top-right
        fontsize: max
        transparency: 75%
        color: cyan
        interrupt: 0
        image:
          path: /config/www/camera_snapshots/front_porch_{{ current_time_str }}.jpg
      message: " "
      title: Front Porch Alert
mode: single
Note: Files in the /www/ folder are accessible to the public internet without authentication if your Home Assistant instance is exposed via a remote URL (e.g., Nabu Casa or DuckDNS). Use a randomized sub-folder name or a cleanup script to mitigate privacy risks.
Pro-Tip The current automation will create a new image every time the alarm triggers. Over time, this will may fill up your storage. Consider a folder cleaner automation. I opted to go this route as Android will cache images with the same filenmame, so it needed to be unique.
Now, whenever a person crosses that invisible line on your porch, your TV will show you exactly who is there.
Other Use Cases
While this post was specifically about sending a notification to an Android TV, there are other reasons you might want to setup an automation in Home Assistant from a smart event in UniFi Protect.
- You have a family member who doesn’t have the UniFi Protect app, but does have the Home Assistant app and wants to receive notifications.
- You want more customization over the notification. Perhaps you want to change the title or message. Maybe on click you want it to take you to a Home Assistant dashboard. Or maybe you want to add notification actions to perform other automations. e.g. Disable notifications for x minutes, etc.
- You want to trigger a Home Assistant automation when a smart event happens. An example might be if a person crosses a line on to your front porch and it’s after 11pm, trigger a security automation.