
Building a Home Assistant Custom Component Part 1: Project Structure and Basics
This is the first part of a multi-part tutorial to create a Home Assistant custom component.
- Part 1 - Project Structure and Basics (Reading Now!)
- Part 2 - Unit Testing and Continuous Integration
- Part 3 - Config Flow
- Part 4 - Options Flow
- Part 5 - Debugging
Introduction
This series of blog posts will be a tutorial for creating your own custom component for Home Assistant. We will start off with a barebones component and add on to it in each post. At the end of the tutorial posts you will have a fully functional component that should give you at least a Silver score on the Integration Quality Scale.
For this project we will be using the GitHub API to provide data for our custom component. There is an existing GitHub integration, but we will be making our own and attempt to improve on the existing integration by adding unit tests, being able to configure it via the UI and hopefully adding some more functionality.
Each post will be a different branch in a GitHub repository so you can follow along in your own editor, or browse the code for each post by looking at the appropriate branch. The changes added in this part can be viewed on the feature/part1 branch.
I’d suggest checking out the official developer documentation to give yourself a better idea of all of the concepts in the Home Assistant architecture.
Project Structure
To get started we need to generate the basic files for our custom component. Fortunately, this is pretty easy to do with my cookiecutter project template.
Let’s install cookiecutter and create our project by answering a few prompts.
$ pip install cookiecutter
$ cookiecutter https://github.com/boralyl/cookiecutter-homeassistant-component
domain [my_component]: github_custom
name [My Component]: Github Custom
docs_url [https://github.com/user/my_component/]: https://github.com/boralyl/github-custom-component-tutorial
owner [@user]: @boralyl
Select config_flow:
1 - yes
2 - no
Choose from 1, 2 [1]: 2
Select iot_class:
1 - Assumed State
2 - Cloud Polling
3 - Cloud Push
4 - Local Polling
5 - Local Push
Choose from 1, 2, 3, 4, 5 [1]: 2
Note: To get started we’ll skip using Config Flow. We’ll add this functionality in a later post in the tutorial.
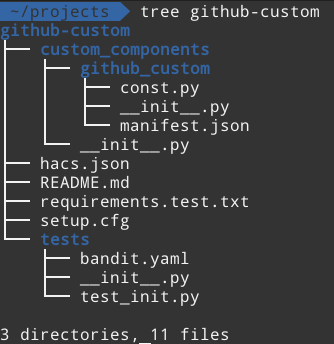 For now we’ll ignore the files in the root directory and the tests directory. Let’s
focus on the
For now we’ll ignore the files in the root directory and the tests directory. Let’s
focus on the custom_components directory and the github_custom directory within that.
The manifest.json
contains some basic information about our component that Home Assistant will use
when setting it up. const.py just contains our constants, in this case just our
DOMAIN
of the component. __init__.py contains the async_setup method which Home Assistant
will call to setup our component.
While the custom component at this point is valid and will load properly if you place
it inside a custom_components directory in your Home Assistant config directory,
it doesn’t actually create any entities.
Implementing the Component
Now it’s time to begin writing our component. There are essentially 4 parts to doing this.
- Add our requirements to the
manifest.json. If we need to add an external python dependency, it needs to be added here. - Add our platform configuration schema. This will define what values we will
expect when a user adds this integration in their
configuration.yaml. - Register all of our sensors with Home Assistant. This will be done in our
async_setup_platformfunction. - Create a new entity that represents the state and data we want to collect
about each GitHub repository. This entity should also implement the
async_updatemethod that updates the data from GitHub.
The final implementation of these 4 parts can be seen in this diff.
One thing to note in that diff, is that I removed the async_setup function from
__init__.py. Because our integration uses a platform, we can remove that code.
Platforms allow you to have multiple instances of the integration instead of just
one. This is useful if you are monitoring both public repositories and perhaps
some private ones that have their own GitHub Enterprise server URL.
Adding Requirements to manifest.json
We will be using the gidgethub library to interact with the GitHub API. It supports asynchronous communication out of the box and is simple and straightforward to work with.
  "documentation": "https://github.com/boralyl/github-custom-component-tutorial",
  "domain": "github_custom",
  "name": "Github Custom",
-  "requirements": []
+  "requirements": ["gidgethub[aiohttp]==4.1.1"]
}
We simply add the requirement to the requirements array with a pinned version
number. One thing to note about this specific library is that the asynchronous
requirements are optional. In order to ensure those dependencies are installed,
we need to specify the aiohttp extra in the requirement.
Platform Configuration Schema
For our platform configuration schema, we are going to follow that of the official GitHub integration. A basic example would look like:
# Example configuration.yaml entry
sensor:
  - platform: github_custom
    access_token: !secret github_access_token
    repositories:
      - path: "home-assistant/core"
        name: "Home Assistant Core"
      - path: "boralyl/steam-wishlist"

  - platform: github_custom
    url: https://my.enterprisegithubserver.com
    access_token: !secret github_access_token
    repositories:
      - path: "company/some-repo"
We aren’t going to change anything here, so the schema will be identical to the official integration:
REPO_SCHEMA = vol.Schema(
    {vol.Required(CONF_PATH): cv.string, vol.Optional(CONF_NAME): cv.string}
)

PLATFORM_SCHEMA = PLATFORM_SCHEMA.extend(
    {
        vol.Required(CONF_ACCESS_TOKEN): cv.string,
        vol.Required(CONF_REPOS): vol.All(cv.ensure_list, [REPO_SCHEMA]),
        vol.Optional(CONF_URL): cv.url,
    }
)
The above is pretty strightforward. We require an access token and a list of
repos. Each repo must have a path key and can optionally have a name key.
We also optionally allow a url key which can be used for a GitHub Enterprise
server URL.
The above code essentially extends the Home Assistant platform schema to add
our domain github_custom to it with the schema above. It will handle the
validation for us and display errors as appropriate.
Register the Sensors
The next step is to register all of our sensors. We will have one sensor for
each repo that was specified in the platform configuration. By convention,
Home Assistant will look for either setup_platform or async_setup_platform
functions in your sensor.py file. If your data will be updated using a library
that uses asyncio to asynchronously fetch data then you should declare the
async_setup_platform function, otherwise create a setup_platform function.
Since the library we are going to use, gidgethub,
supports async, we’ll use the async_setup_platform function.
async def async_setup_platform(
    hass: HomeAssistantType,
    config: ConfigType,
    async_add_entities: Callable,
    discovery_info: Optional[DiscoveryInfoType] = None,
) -> None:
    """Set up the sensor platform."""
    session = async_get_clientsession(hass)
    github = GitHubAPI(session, "requester", oauth_token=config[CONF_ACCESS_TOKEN])
    sensors = [GitHubRepoSensor(github, repo) for repo in config[CONF_REPOS]]
    async_add_entities(sensors, update_before_add=True)
In this function we first retrieve an aiohttp client session. This helper function
takes care of retrieving and closing the session for us (one less thing to think about).
We initialize our GitHub API client and create a GitHubRepoSensor for each repo
that was specified in our coniguration.yaml.
The async_add_entities function will handle adding and registering those sensors
with Home Assistant. The second parameter is worth noting as well. Setting it to
True will tell Home Assistant it should do a data update when the integration
finishes setting up. Without this specified (or setting it to False), it will
wait until SCAN_INTERVAL to fetch data from GitHub. Since that constant is set
to 10 minutes, it means that for the first 10 minutes after Home Assistant is
restarted there will be no data for our sensors (or it will restore data from
the previous update prior to restarting).
GitHubRepoSensor Entity and async_update
The last part of our component is defining our entity and specifying an update method. For brevity, I’m not going to include the full class, but you can view it in GitHub.
The main takeaway is that it extends homeassistant.helpers.entity.Entity, this
class implements most of the required logic for you. We define our own state
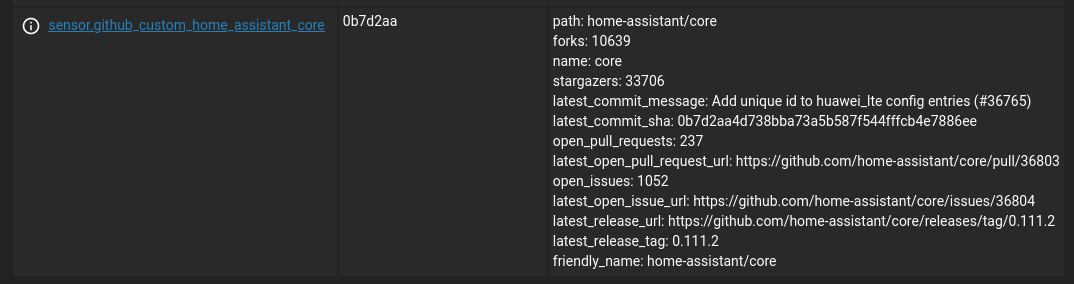
property which returns the state of the sensor. For this sensor we will be using
the first 7 characters of the commit sha. We also define a device_state_attributes
property which returns attributes related to the state that can be accessed by
automations and the lovelace UI.
Our custom sensor class must also specify either an update or async_update
method for fetching the data from GitHub to populate our state and the device_state_attributes.
Again, since our component is using a library that supports async, we include an
async_update method. It fetches all the data that we need from GitHub. Home
Assistant will call this method based on the interval we defined. It’s convention
is to look for a constant named SCAN_INTERVAL. If you define it in your file,
it’s value should be a datetime.timedelta instance. We will use a 10 minute update
interval for our component.
SCAN_INTERVAL = timedelta(minutes=10)
Wrap Up
So we now have a fully functional custom component that is asynchronous, which is an improvement over the official integration.
In the next post we’ll briefly discuss how to add unit testing to help improve your custom component and catch bugs before others do. We will also use GitHub Actions to add continuious integration to your custom component.