

Home Assistant Automation Inspiration
When I first started using Home Assistant 1.5 years ago, one of my favorite things to do was to browse the documentation, community forums and the /r/homeassistant subreddit to see what was possible and what others were doing with their setups. I’ve been motivated by other’s ideas quite a bit, so I decided to share some of my automations in order to help inspire you. Hopefully you find something useful that you can apply to or modify for your Home Assistant installation.
Below are some of my more interesting automations. As I described in a previous post these were written in Node-RED, but should be able to reproduced in the Home Assistant automations as well.
Arrival / Departure
Utilizing device trackers based on our phones being connected to WiFi, Home Assistant can perform arrival and departure automations. When everyone leaves the house:
- Turn off all lights.
- Arm all security cameras.
- Turn off anything playing on the Sonos speakers.
- Sets our thermostat to the Away temperature profile.
When the house is unoccupied and someone arrives home:
- Turn on lights in the house. Light level data from the motion sensors is utilized to know if a light or group of lights should be turned on when someone arrives home. If it’s a sunny day and someone comes home in the middle of the day, it doesn’t always make sense to turn on a light.
- Disarm all security cameras in the house.
- If the Roborock vacuum has run that day and it’s dustbin hasn’t been emptied yet, it will navigate to the trash can and play a text-to-speech over our Sonos speakers asking to empty it.
Good Morning / Good Night
Utilizing the buttons from a Hue Dimmer switch,
I setup an action when long pressing either the On or Off buttons. These actions
are somewhat similar to the Arrival and Departure automations described above.
Long pressing the On button triggers the good morning automation which:
- Turns on lights in the appropriate rooms for getting ready in the morning.
- Begins playing OPB on our Sonos speakers.
- Disables motion sensing for cameras that are in the house.
- Sets our thermostat to the Home temperature profile.
Long pressing the Off button mostly performs the opposite actions. It will:
- Turn off all the lights in the house.
- Arms all of the security cameras.
- Turns off any TV we may have left on.
- Sets our thermostat to the Sleep temperature profile.
- Checks if the back door or garage door were left open and sends a notification if either one is open.
Basement Lighting
We have an unfinished basement that has many light bulbs that require pulling a string to turn them on or off. At first we used a Hue dimmer switch which with one press will turn on all the lights or turn them all off. This was a huge win, but after a bit of time I came up with an even better solution. Using a Xioami window/door sensor on the basement door, I setup an automation to turn on all of the basement lights when the basement door is opened and to turn off all of the lights when the basement door is closed.
This works out great for us as a motion sensor wouldn’t quite work in this space as we’d need multiple to cover the various areas in the basement.
Front Porch Alert
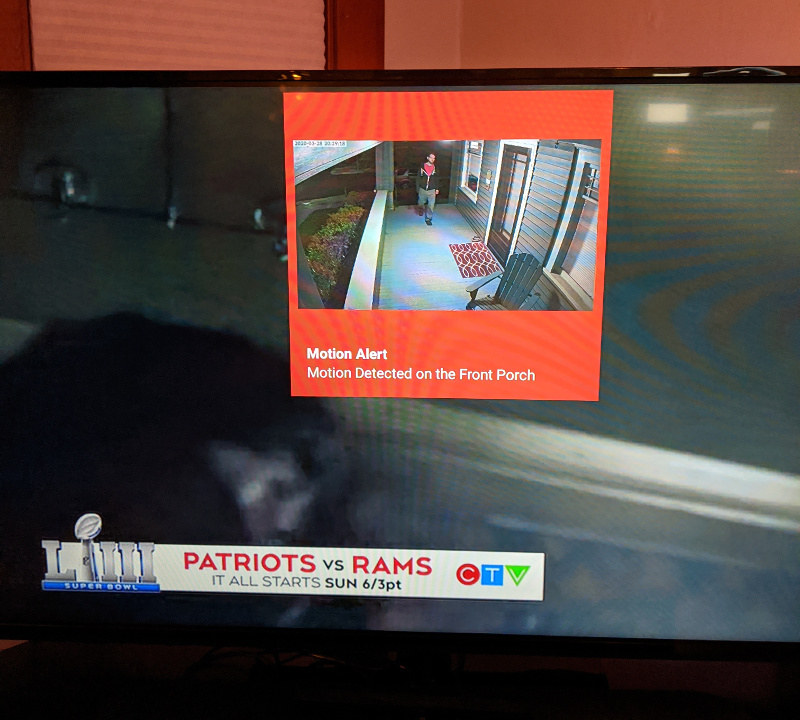 One of my favorite automations utilizes three disparate devices. A cheap Xioami
motion sensor on the front porch is used to sense motion. When it triggers a motion
event, Home Assistant instructs my Unifi camera to take a snapshot image. This
snapshot image is then sent in a push notification to our Nvidia Shield using the
Notifications for Android TV
integration. If we happen to be watching TV we’ll see exactly who is at the door,
before they get a chance to knock. A push notification with the image attached is
also sent to our phones in the event no one is home or we aren’t watching TV.
One of my favorite automations utilizes three disparate devices. A cheap Xioami
motion sensor on the front porch is used to sense motion. When it triggers a motion
event, Home Assistant instructs my Unifi camera to take a snapshot image. This
snapshot image is then sent in a push notification to our Nvidia Shield using the
Notifications for Android TV
integration. If we happen to be watching TV we’ll see exactly who is at the door,
before they get a chance to knock. A push notification with the image attached is
also sent to our phones in the event no one is home or we aren’t watching TV.
The Unifi camera entity is added using the unifiprotect custom component.
When the motion sensor triggers a motion event, I set a 2 second timer since it tends
to trigger before anyone is fully on the porch. This allows the snapshot image to
be more useful. To get the snapshot I use the camera.snapshot service and specify the filename service data attribute
as a file in my local www directory (e.g. filename: /config/www/snapshot.jpg).
This will get overwritten every time there is a new motion event, but that’s not a problem
since it’s only used once to send the notifications to our phones and TV. Finally
the notification is sent using the notify
integration in conjunction with the entity added by the mobile_app integration.
The service data for Android for the notification is:
message: "Motion Detected on the Front Porch"
data:
   image: "http://10.1.1.1:8123/local/snapshot.jpg",
   stream_source: "camera.uvc_g3_flex_aa16"
The service data for iOS is slightly different:
message: Motion Detected on the Front Porch
data:
  attachment:
    url: http://10.1.1.1:8123/local/snapshot.jpg
    content-type: jpg
    hide-thumbnail: false
  entity_id: camera.uvc_g3_flex_aa16
  push:
    category: camera
Tapping on the push notification will launch a RTSP stream for the camera.
Circadian Lighting
I’ll quote the custom component’s blurb on it’s README:
Circadian Lighting slowly synchronizes your color changing lights with the regular naturally occurring color temperature of the sky throughout the day. This gives your environment a more natural feel, with cooler hues during the midday and warmer tints near twilight and dawn. Stay healthier and sleep better by syncing your lights with natural daylight to maintain your circadian rhythm!
I was surprised at how well this works in the evenings. The dimmer and warmer lighting really does help get me to sleep on a normal schedule. I decided to only set this up on lights in our living room, since that it the space we are mostly likely in during the night-time. You can also create a toggle to disable this if you need brighter lighting for hosting guests or other related events. A switch entity is created by default when installing the component that you can use to toggle this lighting.
Media Lighting
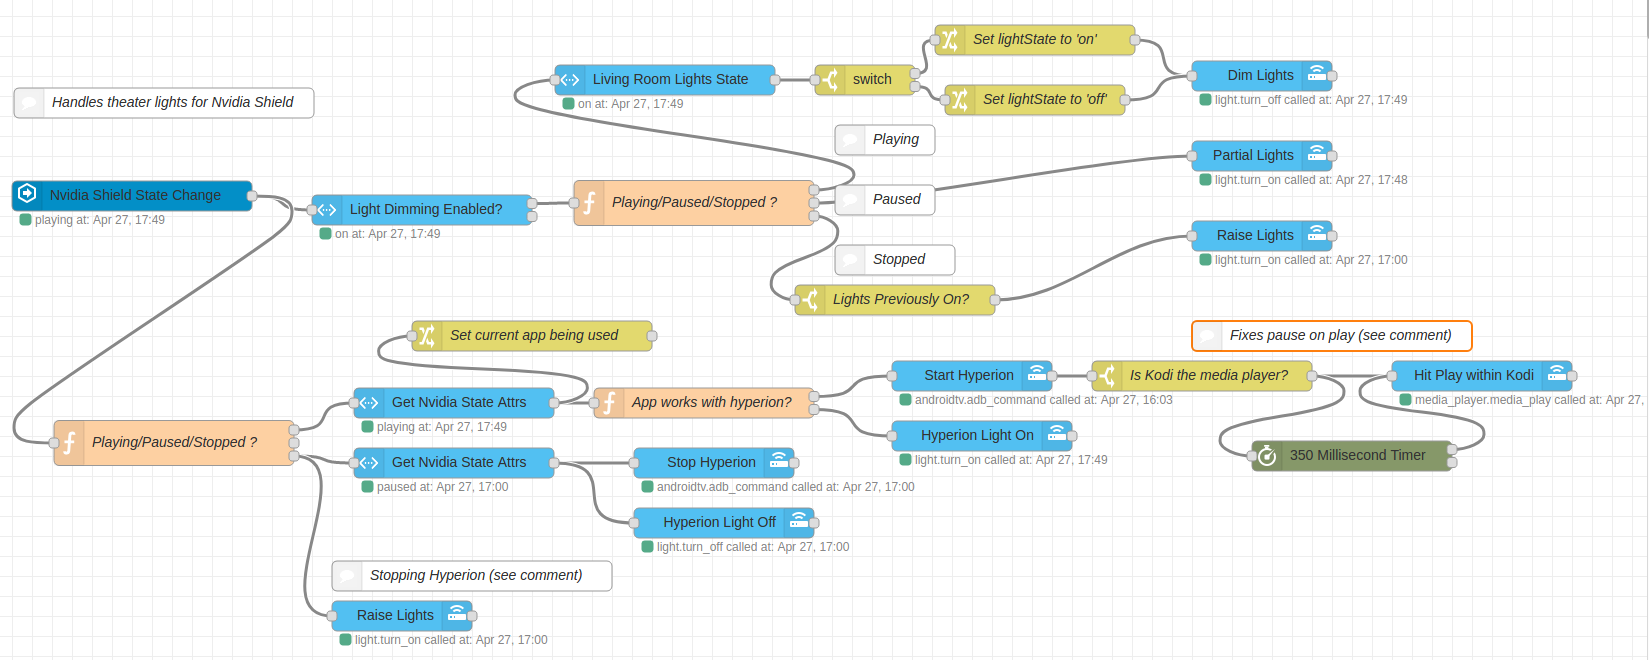
This automation serves 2 purposes:
- When media begins playing, turn off the lights. On pause, bring the lights up 50%. On stop, turn the lights fully on.
- When media begins playing, turn on my lightpack.tv lights, controlled by hyperion. When media stops, turn off those lights.
However, there are several issues that require a more complicated flow. The theater lights is pretty straightforward. It checks if an input boolean is enabled then will check the current state and change the lights accordingly. Sometimes it’s not appropriate to have theater lighting, so it’s nice to be able to temporarily disable it with the input boolean.
The hyperion lights are a bit more complicated to make it work with Android on the Nividia Shield. I use the hyperion-android-grabber app to capture what’s on the screen and make the lights match accordingly. This service needs to run in the background to be able to capture this data. One of the problems is some apps have DRM protection so it’s not possible to capture an image of what is playing. This causes the service to just see black, so the lights remain off. So I created a whitelist of apps that have DRM protection like Netflix. For these apps, it simply turns on a 50% white color. For all other apps it will start the service to match the light colors based on what’s on the screen.
The last problem is with kodi. When the hyperion service starts it momentarily is in the foreground (even though you don’t see it starting). This causes kodi to pause the media since it no longer has focus. To get around this I immediately hit play again if kodi is the running app. However, sometimes that play command happens before the hyperion service has fully started and backgrounds itself. To fix this, I added a 350 millisecond timer that will hit play when it times out. In my experimentation this is the maximum amount of time for the hyperion service to start.
Vacuum
I’ve written extensively about the automations I use with my Roborock S4 Vacuum in a previous post, so if you haven’t read that post yet, take a look!
Toggling HA Remote Access
I subscribe to Nabu Casa to support Home Assistant.
In addition to supporting an awesome project, it also gives you remote access
to your home assistant instance with ease. I very rarely access my Home Assistant
instance remotely, but it’s nice to have. That being said, I don’t need to have
remote access enabled if I am home. So, I created a simple automation based on
the presence of my device tracker to enable or disable remote access. When I
arrive home it calls the cloud.remote_disconnect service to disable remote access.
When I leave it calls the cloud.remote_connect service to enable remote access.
Garage Door Automations
There have been a handful of times where I simply forgot that I left the garage door open and it stays that way until I head out in the morning to go to work. To prevent this from ever happening I’ve automated the garage door. I can control it locally and via Home Assistant. When the garage door opens, it starts a 15 minute timer. At the end of that timer it will auto-close the garage door. This is great, but if I am doing yard work, or something in the garage, it’s annoying to have it close on me. To resolve this, I created an input boolean that will allow me to toggle that automation on or off. If the 15 minute timer is already running and I disable the automation it will cancel the timer and prevent the garage door from closing. Just in case I forget to turn the automation back on, Home Assistant will always enable it every night at midnight.
One of the other automations around my garage door, is to send us a notification if the grage door is opened and no one is home. Because it may take a few minutes for one of our phones to connect to our WiFi when we get home, the notification is delayed by 2 minutes. If Home Assistant detects that we are now home in that 2 minute period, it will cancel sending the false-positive notification.