
Node-RED for Automations in Home Assistant
In this post I’ll outline what Node-RED is, why you would want to use it over the default Home Assistant automations, provide some beginner resources and finally document some tips and tricks I wish I knew when I began using Node-RED.
What is Node-RED?
Per their website, Node-RED is a programming tool for wiring together hardware devices, APIs and online services in new and interesting ways. It can be combined with Home Assistant via an Add-on or with Home Assistant Core by running Node-RED as it’s own service. After Node-RED is running you can then add the node-red-contrib-home-assistant-websocket palette to begin wiring up your automations for Home Assistant.
Why Node-RED?
I must admit, when I first learned about Node-RED I didn’t think it was for me. I am a software engineer, so I thought to myself, why do I need a visual way to define automations when I can simply write them in yaml?
Home Assistant uses their UI or yaml to define automations. For basic automations this works just fine, however once you add more devices and want to do more automations based on the states of those devices, the yaml format becomes particularly limiting and cumbersome.
More Powerful Automations
Using Node-RED you can perform loops, define flow level and global variables,
execute arbitrary javascript code to process incoming information and much more.
This is one area that Node-RED shines. There is a lot that can be done with the
default flows and beyond that you can install additional flows through the
Manage palatte menu. Some of my most used include:
- node-red-contrib-bigtimer - I use this for many time automations.
- node-red-contrib-stoptimer - Used to start/stop/restart timers to perform an action.
- node-red-contrib-weekday - Filters events based on if selected days of the week are met.
More flows can be found here.
Debugging Automations
This is one of my biggest complaints about the default yaml (or UI) automations used by in Home Assistant. It is really hard to figure out why an automation doesn’t work or what the problem might be. Additionally, there isn’t an easy way to test out a flow that depends on certain conditions to be set, like away mode is activated on a weekend.

Debugging in Node-RED on the other hand is much easier to do. Most nodes will
display the last time they were triggered and what their state was at that time.
Any errors that may have occurred will be displayed in the Debug Messages side
panel. Clicking on an error will highlight the node that caused it which can really
help in a complex automation. I’ll dive deeper into debugging below.
Reusing Flows
It’s quite common that you may have a series of actions in your automations that you want to re-use without having to copy/paste it all over the place. Node-RED allows you to do that by defining your own sub-flows which consist of a set of nodes that can be reused with any automation.
Using Node-RED with Home Assistant
I like to think of Home Assistant as the place where devices are managed and states are stored and updated. Node-RED then uses that information by listening for events to perform automations by making service calls to Home Assistant.
Beginner Resources
I found Rob’s youtube channel over at The Hook Up to be an extremely useful resource in general. He has a 3 part series to get you started with using Node-Red with Home Assistant.
- Node-RED + Home Assistant How-To
- Mastering Node-RED: Custom Alexa Commands + Node-RED Dashboard
- Node-RED Pt.3: Trigger and Events: All nodes. Motion Lighting and Actionable Notifications.
Juan over at JuanMTech has a fantastic guide along with a video tutorial that is kept up to date.
The y palette that is used to interact with Home Assistant not only has detailed documentation on the nodes it provides, but also has a basic tutorial and some cookbook recipes to inspire you.
Finally, as I recently learned, the Node-RED documentation is excellent. Considering that most of the nodes you use will be from the default set provided by Node-RED, I can’t stress enough how useful and extremely well written these are.
Tips and Tricks
Below are a few things I wish I would have known when I first got started using Node-RED with Home Assistant.
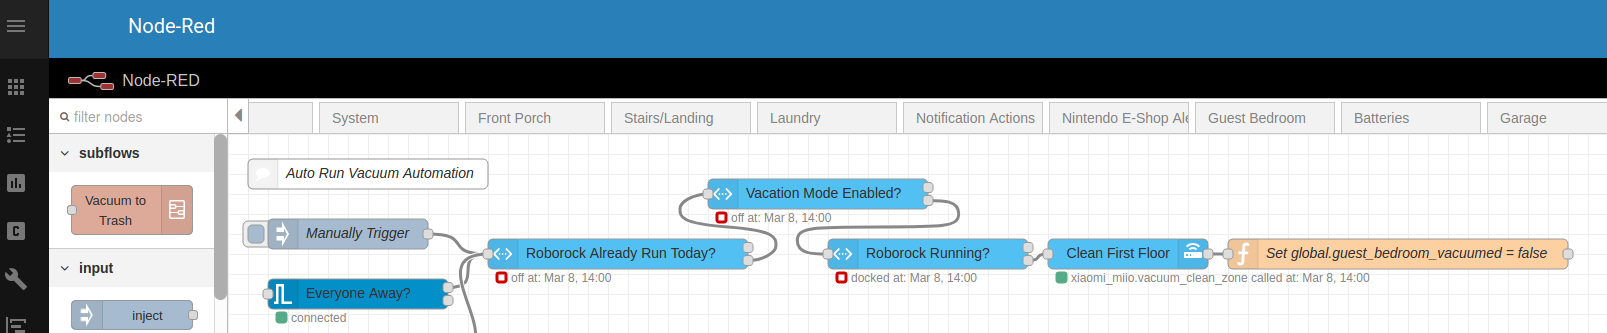
Organizing Flows
If you want to, you could define all of your flows on a single tab. This however is not very reasonable when you have many automations, each of which can have 1-n nodes.
I prefer creating multiple tabs that are broken down by area or if area doesn’t make sense, then subject matter. This is obviously subjective and you should organize your tabs in any way that makes sense to you.

I currently organize my flows into the following tabs (note: each tab is a flow in Node-RED.):
Media- All automations that deal with media players (TV, nvidia shield, etc.).Living Room- Automations related to the living room (lighting, switches, etc.)Master Bedroom- Automations related to the master bedroom (lighting, motion sensors, switches).Location- Automations related to location (home/away).Kitchen- Automations related to the kitchen (lighting, motion sensors, contact sensors, etc.)Hallway- Automations related to the hallway (lighting, motion sensors).System- Automations related to Home Assistant (automations that run on start) and other devices (NAS storage alerts, etc.).Laundry- Automations related to the washer and dryer.Notification Actions- Automations related to handling clicks on actionable notifications from the Home Assistant Android app.Nintendo E-Shop Alerts- Automations for sending alerts when Nintendo Switch e-shop games go on sale.Batteries- Automations that provide alerts for low batteries on my various devices.Vacuum- Automations related to my Roborock S4 vacuum. I’ve written about these in much detail here.
Running Automations on a Schedule
This wasn’t super obvious to me when I first started using Node-RED, but the way to do this is very simple. The answer is using an Inject Node.

If you edit the node you can change the Repeat drop down to at a specific time.
Then you just specify the time (in 24 hour format) and which days it should repeat
on. Finally add another node for the service you would like to run and wire it up.
Subflows

A Node-Red Subflow is a collection of nodes that you define as a single node. It can be reused across all of your automations and tabs. If you know anything about software development, you can think of a subflow as a function. It can have inputs and outputs and many steps in-between.
There are two ways to create a subflow. You can create an empty one via the context
menu Subflows -> Create Subflow. The other way is to select the nodes you would
like to add to a subflow then use the context menu Subflows -> Selection to Subflow.
After you create your subflow it will show up at the top of the node selection
in the left hand panel. You can drag and drop them to use them in any of your
automations without having to duplicate the sequence of nodes.
Refer to the documentation for further details on how to create and use subflows.
Global and Flow Context Variables
Global and Flow variables (or context per the documentation) are values you can set and read from between nodes, without having to pass a message directly to the node. Perhaps you have an automation whose trigger can occur multiple times a day, but you only want the automation to run once a day. You could define a variable to indicate if the automation ran today or not. If so then it would gate the automation from running. Then you could setup another automation to run on a schedule that resets the variable every day at midnight.
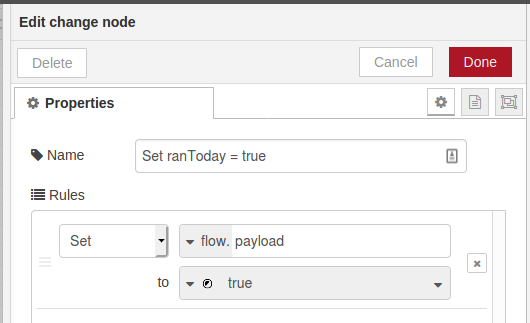
A change node can be used to
set the value. A flow variable is available to all nodes on the flow (or tab)
that you are currently on. A global variable is accessible by all nodes on all
flows (tabs).

A switch node can be configured
to send the output to the configured wire based on the value of the flow or global
context variable. In the above example if the flow variable ranToday is true
it will go to the first output, otherwise it will go to the second output.
One thing to be aware of is that by default context variables (both flow and global)
are stored in memory. If you restart Node-RED you will lose any values you set.
If you want to persist the values between restarts you can enable saving the data
to local disk. To do this edit your settings.js file and uncomment or add a
contextStorage section. It should look like the following:
contextStorage: {
   default: {
       module: "localfilesystem"
   }
}
This will cause the values to be cached in memory and flushed to disk every 30 seconds.
Debugging
There are several ways to debug your automations in Node-RED.
The most apparent way is by viewing the status reported by nodes after they have
been executed. The information that is displayed depends on the type of node.
In the example here, it shows the state of the basement door sensor change at the
time that it was triggered. This alone can provide a lot of information into
why your automation is working or not.
Debug Node

The Debug node allows you to
log information coming from the output of a node. You can add a wire from a node,
whose message data you want to see, to a debug node. When that node is executed
the message data will be displayed in the debug panel on the right hand side.
 This will display a large amount of information about that data flowing through
the node. Each key will be collapsed initially, but you can drill down to go
deeper into the data.
This will display a large amount of information about that data flowing through
the node. Each key will be collapsed initially, but you can drill down to go
deeper into the data.
Sometimes if you have a lot of debug nodes it can be tricky to figure out which one triggered the message. There are two ways to tell, the first is by providing a descriptive name when configuring your Debug Node. The name appears at the top of the message. If you forget to specify a name you can also click on the default name and it will highlight the node that emitted the debug message in your flow.
If you would like to limit the amount of information that shows up in the debug
panel you can alter the Output when editing the debug node. It defaults to
msg.payload which in this example, with the kodi media player, would just be playing.
You can specify any other key you would like to see in the debug panel or simply
log the entire message itself.
Injecting Data for Testing
The Inject node can be used to manually trigger the execution of a flow of nodes. This allows you to test and verify your automation works without having to wait for the actual trigger. Placing the node at the beginning of your flow and wiring it up to the first node is all that needs to be done. A button will appear on the left side of the node that can be clicked to begin the execution.
In addition to simply starting a flow, you can also mock the message payload to match that
expected by the flow. The initial trigger may be a state change in Home
Assistant, so you will need to provide a payload that looks like that one in
your inject node. Fortunately this is failry easy to configure. Simply open the
inject node and add the data to the Payload field. The easiest way to determine
what data you should enter for the payload is to add a Debug node
to the output of the first node in your flow. You can then copy and modify this
value to set the payload of your inject node.

In the above example I inject the expected payload in order to test that I can get the Nintendo Switch game on sale and have it send an alert both via push notification to my phone and to my Nvidia Shield. You can import this flow and see how it works by downloading the JSON Export of this Flow.
If you are interested in getting notifications about when Nintendo Switch games go on sale that are on your wish list you can install my custom component.
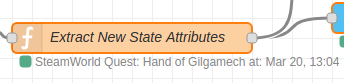
Adding Status to a Function Node
Function nodes give you a powerful way to process data and output it. Unfortunately, by default there is no status displayed on this node when it is executed. There is a way to accomplish this and it’s extremely customizable. Within the javascript logic of your Function Node you can set the node status using a function call. Below is an example from the Nintendo Switch alert flow above.
msg.payload = msg.data.event.new_state.attributes.on_sale[0];
// Get a pretty date in the format: `Mar 20, 13:04`
var date = new Date().toLocaleDateString('en-US', {
    month: 'short',
    day: 'numeric',
    hour12: false,
    hour: 'numeric',
    minute: 'numeric'
})
// In our `msg.payload` the `title` attribute contains the name of the game.
var statusText = `${msg.payload.title} at: ${date}`
// `node.status` will display the actual status below your function node using
// the data you provide here.
node.status({fill: "green", shape: "dot", text: statusText});
return msg;
Here is an example of what you would see in your flow:
About Entity Auto-Completion
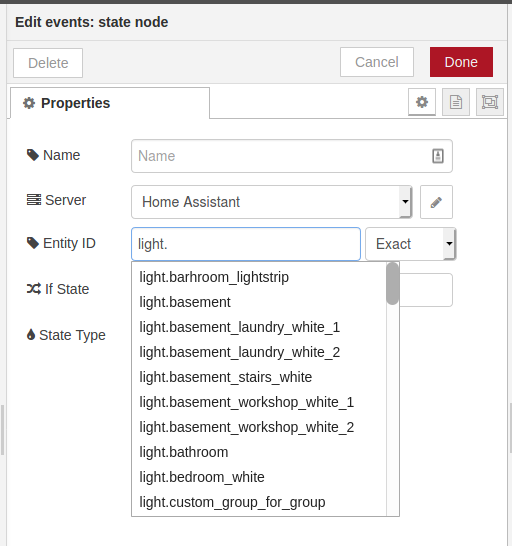
Another really useful feature of of the node-red-contrib-home-assistant-websocket
palette is that it will auto-complete your entity names when you begin typing.
There is a caveat to this though. If you add an entity while Node-RED is running
it will not show up in the auto-complete dropdown. It will still work if you
manually type it in, however. In order to get the newly added entities to show
up, you will need to restart Node-RED. This confused me when I was first getting
started, so I wanted to call attention to it.
Wrap Up
I hope this helps you in your journey of understanding and using Node-RED to power your Home Assistant automations. Node-RED provides powerful software that can take your home automations to the next level.